If you also want to land in a Lunar base, then apart from IMFD you'll also need BaseSyncMFD and Reentry MFD. Activate them all in Modules tab. Activate ExtMFD as well, that is External MFD.
We'll use IMFD's new functionality - three dimentional projection rotation, which explains a few things. In this moment it would be good if you looked at the last page of IMFD's manual, version 4.6, (..\orbiter]\doc\interplanetarymfd\manual46.pdf ), where there are written possible transfers on other bodies. We'll get back to it soon.
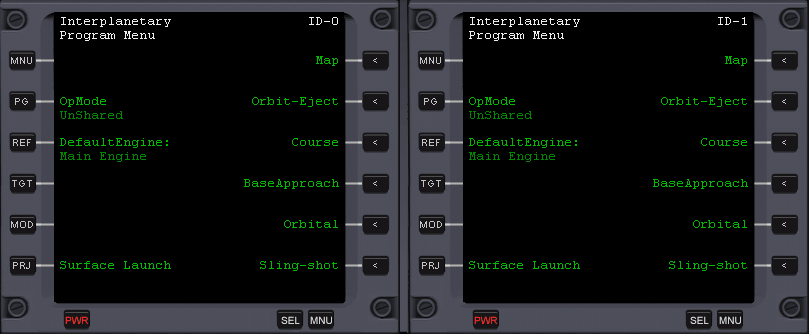
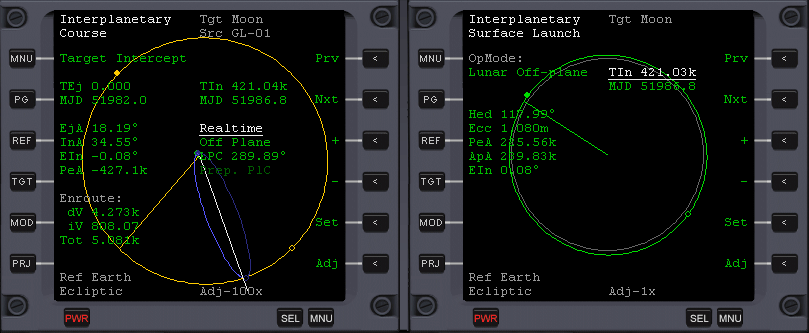
Open IMFD in both displays and press MNU button in top-left corners of both MFDs. Notice ID numbers in top-right corners, in white color.
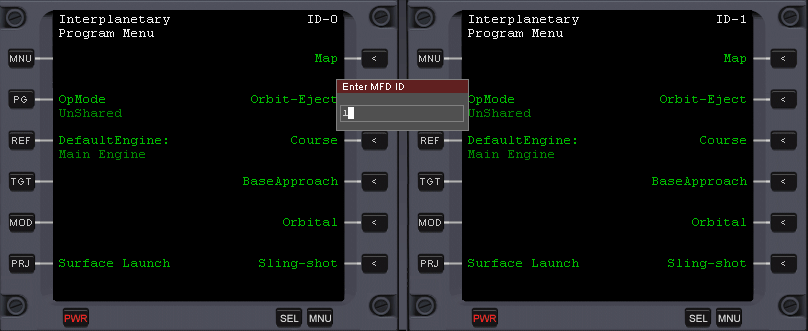
We should associate left IMFD with the right one and we'll do it using PG button next to Operation Mode. Press the PG button in left display and enter ID of the right one (or vice versa - PG of the right one and ID of the left one) and confirm with Enter.
This feature allows to share information between respective instances of IMFD, even those open as external displays in windows (ExtMFD).
Time to target the Moon. In the left display (necessarily, because the 3D rotation is only available there) click on Course and choose Target intercept from the menu. We switch between items using Next and Previous buttons and select them using Set button. Choose the Moon as the target - use TGT button and enter moon from your keyboard. If you ever wanted to choose a different program from the Course submenu, you'll have to highlight Target intercept (the currently active program) and use + and - buttons (by these buttons we modify values in IMFD). Remember though, that when you choose a different program, then the variables from the previous program will be erased, so if you can, alter the program in an another display, unassociated by ID.
Important information: If the graphical representation in Target Intercept dissapears, as a result of switching cockpit modes (F8), you'll have to switch Target Intercept to Orbit Insert from the Course menu, return to Target Intercept and target once again. It's a IMFD's 4.6 bug workaround.
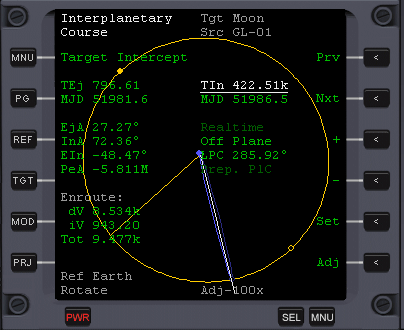
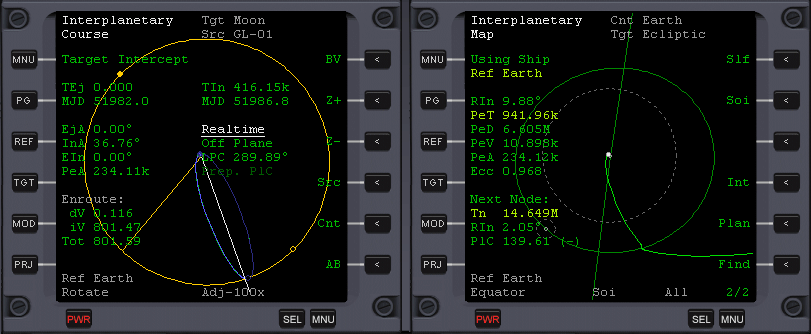
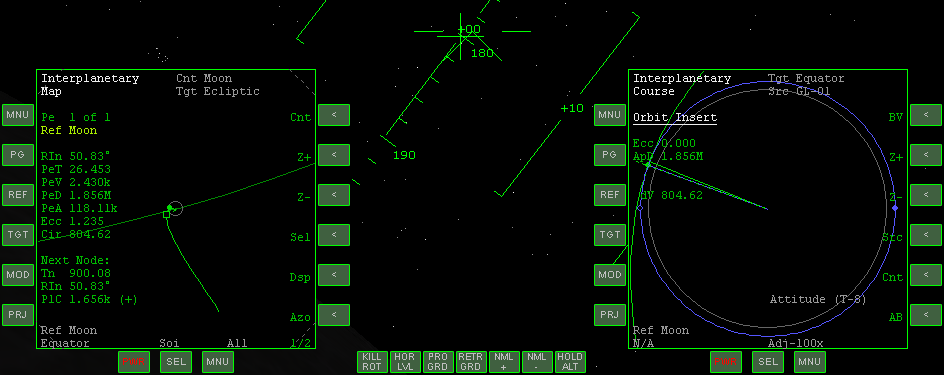
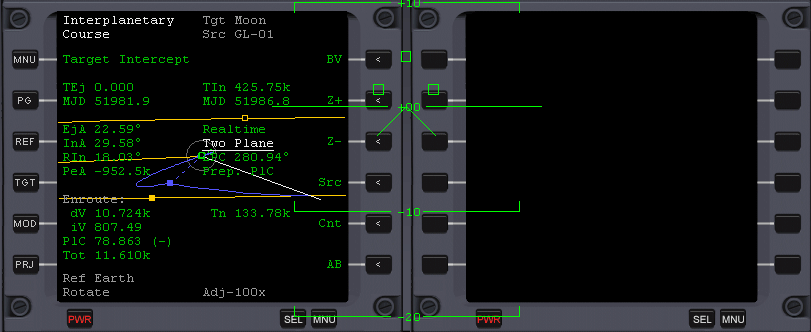
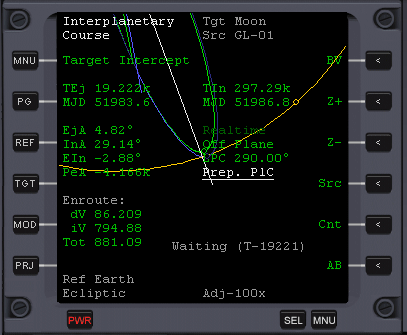
On the picture we can see an orange target's orbit (ie. the Moon's) along with its position in orbit (radius) and a blue orbit - the planned one. You may use Z+ and Z- buttons from the next page of buttons (press PG - PaGe), to see the source planet, ie. the Earth. In the middle there is always the body which is set as a reference body (check the bottom). We can change it with the Ref button. White radius is a place of interception of the target after the time specified by TIn (Time of Insertion). IMFD automatically calculates the transfer orbit as one close to a Hohmann transfer orbit, which requires least amount of energy. If you lessen TIn, then it would mean that you want to intercept the target sooner, and for this you'd need more energy, what IMFD will also automatically calculate. Try to lessen TIn now and see what happens. TEj (Time of Ejection) is the time from now, up to the moment when yo want to ignite your engines while already on orbit. If you change these values and want to return to the previous state, target the Moon again, what will make IMFD calculate the optimal transfer once again.
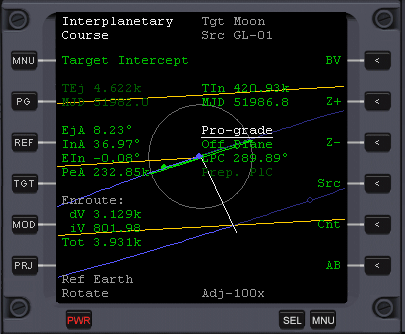
Target intercept offers a few possible transrers, chosen by highlighting Off-Plane and pressing + and -. Time for a short overview of the first of them - Off-Plane. You may now look at IMFD's 4.6 manual, appendix A, on the last page.
Off-Plane - (from IMFD's manual:) this method will create a trajectory that will intercept the target directly. This is the easiest way to reach the destination but it's also very often the most inefficient way (the latter doesn't apply to lunar transfers). In this method there is no plane change or any other maneuver during the flight. In some special cases this may be the only working method. In this method the EIn is presenting how much the target is out of source plane at time of interception. To allow a successful transfer, you need to keep EIn close to 0.
Will you agree that the planned orbit in the display looks a bit flat? To see how it looks for real, do the following thing: Press and hold LShift + Space and move your mouse so that the projection to Earth is parallel to Moon's orbital plane, simultaneously (up/down with mouse) moving the white radius so that it's more or less in the center, so in a straight line between you and Earth. Now by using the buttons from the next page (PG) Z+ and Z-, zoom the view so you can see the planned orbit. It should look like this:
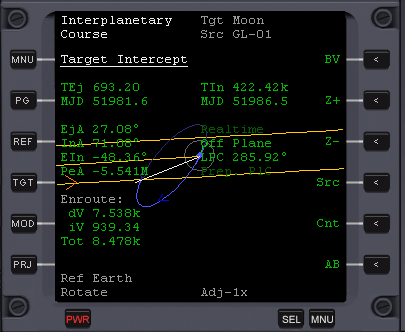
You're probably used to the fact that to meet a target, your orbital planes must be algned. In the case of Off-Plane transfer we meet exactly in the place of intersection of our orbits (in nodes), so no alignment is necessary.
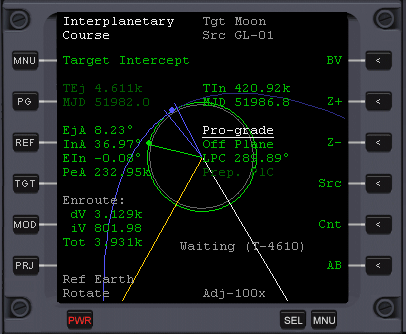
Notice a regularity, that both times (TEj and TIn) decrease by the same values [s], what is logical. If however you are sitting on a pad and TEj decreases to 0, TIn will still be decreasing what will make the program think that you want to intercept the target sooner, what requires more energy thus our planned orbit will change. (Try to accelerate the time and observe our planned orbit. TGT, moon and Enter to calculate again) This is why to shift the launch and interception time for a later time, while still keeping given parameters of the transfer, we must change TEj and TIn by the same ammounts. What matters for IMFD is a difference between these two parameters, which is constant when TEj > 0, and on this difference basis is the required energy (or dV) calculated. Of course what also matters, is changing position of source and target bodies as well as our surface position.
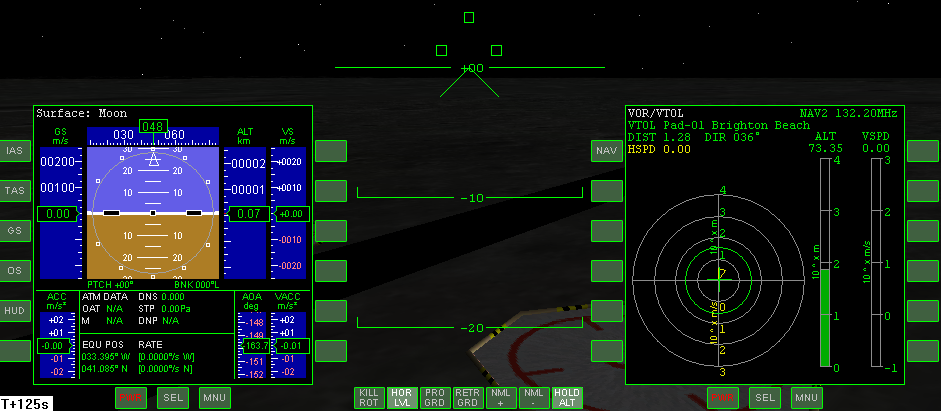
In the right display choose Surface Launch, available from the main menu. Switch Op-mode to Lunar Off-plane, and also target the Moon.
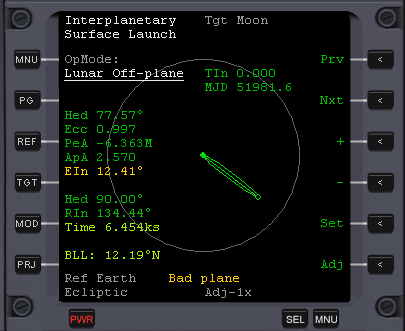
Surface Launch gives us Heading, that is a direction in which we must insert into orbit now, so that our orbit is suitable for an Off-plane transfer. Along we have the mentioned EIn, which we must keep at 0 by keping the proper direction and also on the bottom, an optimal Heading which allows a best usage of planet's rotation, the Time which must pass so a launch with this heading is possible and Best Launch Latitude for a given target, about which we don't actually care now.
Dear readers... It's iportant to know that the data which Surface Launch gives us now are totally absurd :). TIn in the top-right corner is 0, which means that we want to intercept the target now, what is a nonsence. Target Intercept and Surface Launch in OpMode: Lunar Off-plane are not associated in any way, except the values which we pass to the second by ourselves. Particularily I mean the TIn parameter which has been calculated in Target Intercept. Pass it now manually to the Surface Launch, by highlighting (Prv and Nxt buttons) TIn and click Set. enter the same value, remembering about the multiplier, so ie. enter 422.52k
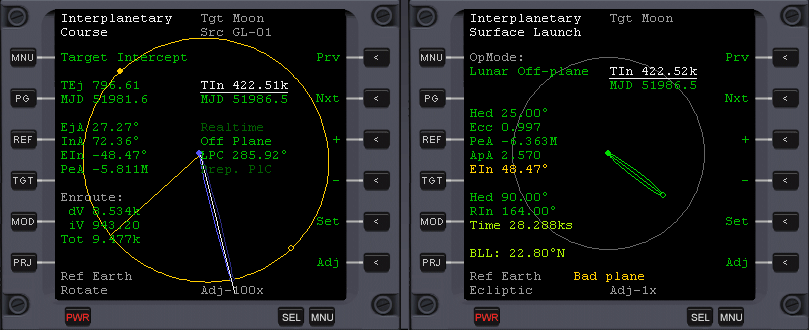
As we can see, Time changed to 28.882 ks so this is when we'll use the Earth's rotation optimally. This means that our TLI (Trans Lunar Injection) will have to occur after the starting Time from Surace Launch because we still need to reach the orbit in some amount of time. Set the Ajustment Factor in Target Intercept by pressing on Adj button so that the grey text the bottom shows Adh - 100x. Now increase TEj as many times as is necessary to make it a bit bigger than Time from Surface Launch, remembering how many times you increased it. After doing so, highlight TIn and increase it's value the same number of times that you increased the TEj. You've made a fisrt step towards planning an optimal launch moment, while keeping the transfer's parameters more or less.
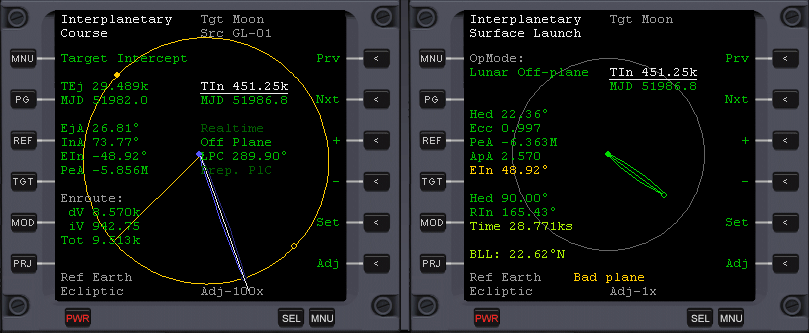
However, remember that Surface Launch gives us a bit incorrect values again because we've increased TIn only in Target Intercept. Enter the new value into Surface Launch and check if the returned time suits you (is close to TEj). If so, then you've just fully planned an optimal launch and we must wait for Time to go down to 0 and start with the given Heading, placed a bit above the middle of IMFD, in this case: 90°.
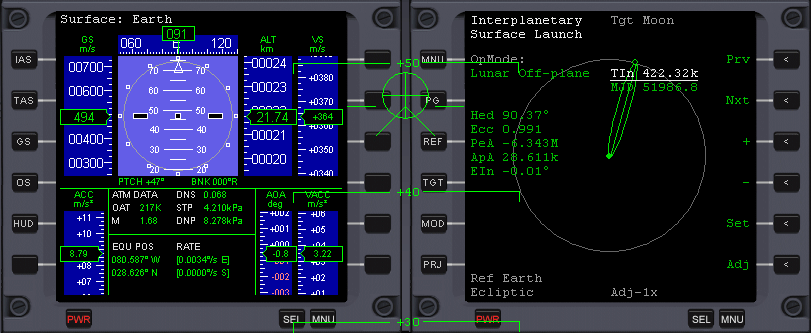
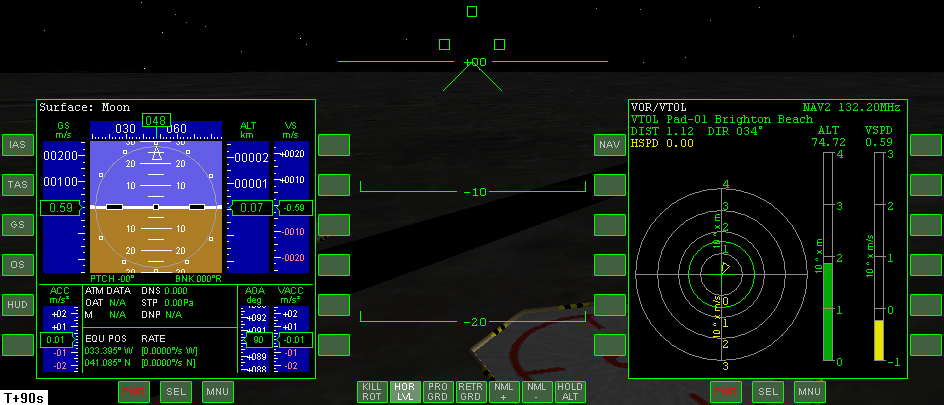
Switch on Surface HUD (H key) and insert your ship into orbit. During insertion keep checking if EIn is close to 0. You may correct it by yawing - Num 1 and Num 3. The sooner you start correcting it, the less fuel you'll use for the correction.
When you have entered the orbit, highlight the Realtime parameter and change it to Prograde with + or - button. This is a very important step. The Prograde mode will calculate the optimal engines' igninition time, while Realtime will always want to burn when TEj=0, so if you choose TEj incorrectly, then it will lead to a totally incorrect transfer orbit. The change to Prograde from Realtime is possible only if EIn is close to 0. Notice that EIn is also displayed in Target Intercept in Off-plane mode, so we may now disable the Surface Launch.
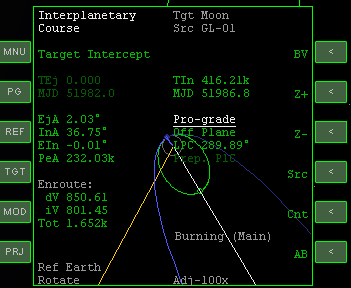
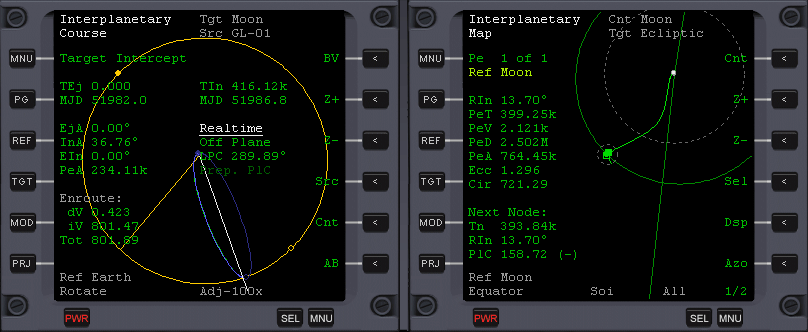
A close up to show that the plane of our current orbit (green) is close to the planned one's (blue) what is defined by the EIn parameter
What we need to do now is to enable AutoBurn (AB button) to activate a somewhat autopilot mode and wait until we reach the first blue radius on our way, which defines the position of TLI - Trans Lunar Injection (in 4610 seconds).

During my simulation, bacause of nonspherical gravity sources my EIn drifted beyond an admissable value (formally > 1.00 but my EIn was even smaller), what makes using Pro-grade mode impossible, so I had to disable AutoBurn and make a plane change (over the equator but not necessarily) in the direction of Orbit normal or Orbit anti-normal, and as you can see, I brought EIn down to 0. After this I change Realtime to Prograde again, switch on AB and wait.
IMFD is performing the AutoBurn. In the right display you may enable IMFD - Map program. Click on the MNU button and choose Map from the top right corner. Click the Dsp button (Display) which will display bodies' orbits, zoom out so that you can see Earth and Moon only and then on the next page (PG) klick the Soi button (Sphere of incluence - sphere whose end defines a place where the body's gravity creating the sphere influences our ship in 50% only)
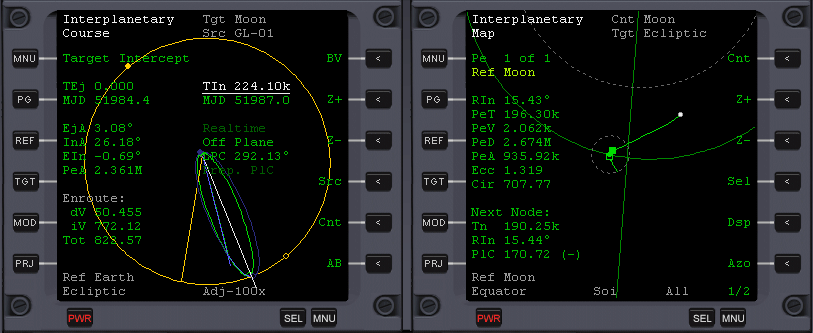
The visible distortion of our trajectory upon reaching Moon's orbit is a good sign. It tells that we'll be so close to the Moon that it's gravity will distort our trajectory.
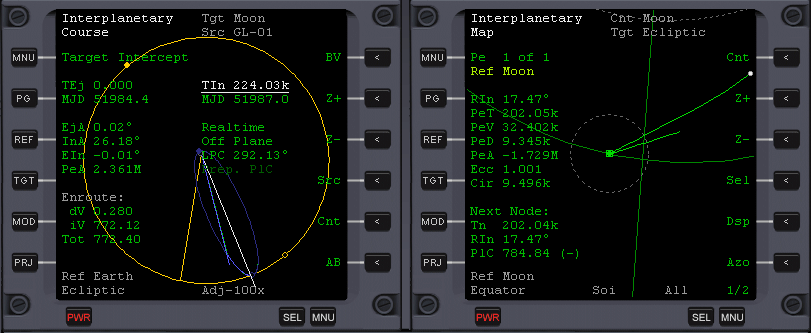
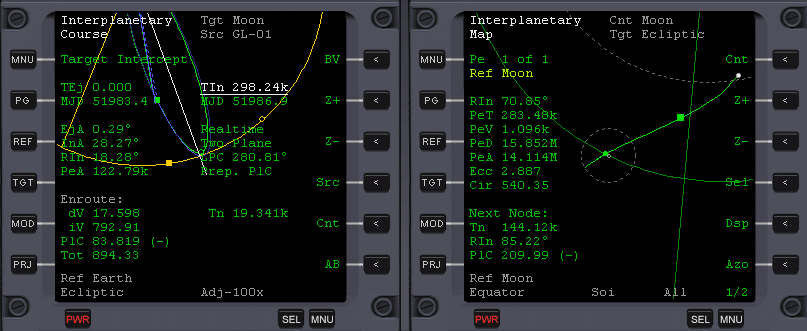
I've switched the reference body in Map Program, with the help of Ref button. The trajectory that we see now is the one seen from the Moon. Also the numerical values that we see refer to the Moon now. We're most interested in PeA, that is the altitude of Perilunium. Because IMFD's Map Program is a very precise tool, allowing to calculate all the values by taking all the bodies in a system into account, by watching the PeA and seeing that it's a bit big after all, we know that we'll need a course correction. However, we can't make the cource correction while still beilng in the source body's Sphere of influence. Accelerate time up to a moment when you'll have a similar picture: (our ship beyond the Earth's SOI)
In Target Intercept, start modifying TIn so that Tot (Total) dV (that is a total required velocity change) in the bottom-left corner is minimal. Notice that in this moment we're changing the actual interception time. When Tot dV is at minimal value, accelerate time and check if Tot increases or decreases. If it increases, enable AB at once and if it decreases, enable AB when it's at its minimum.
Course correction has been performed. Notice the value of PeA now. From now on if you haven't done anything, then you'd smash your ship on the Surface of the Moon, but as long as we're far away from its SOI, we don't have to worry about it. Accelerate time up to a moment when you enter the SOI, as shown below:
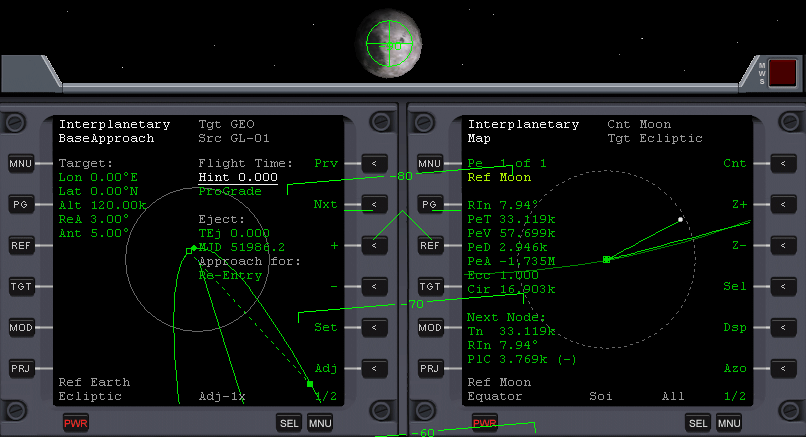
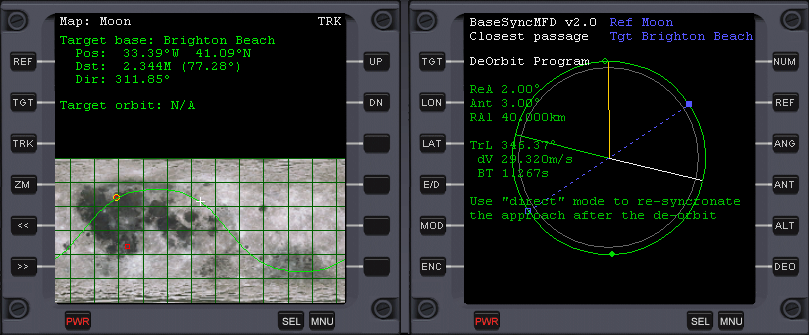
To see the Moon from your cockpit, rotate the ship to find -90° on the Surface HUD. In the left display, click on the MNU and choose BaseApproach. Notice that the reference body in lower left corner is set to Earth. Change it to Moon with the Ref button. Next target Brighton Beach or any other base on the Moon you may have. Then highlight "Reentry" under "Approach for:" and change it to Orbit-insert. After doing it, you should also set additional parameters, such as: Altitude (remember about the k multiplier after the number) and the amount of orbits that you want to make over the body until it rotates by such an angle that our trajectory roughly intersects the base - the Number parameter. After setting all the parameters and making sure that dV isn't an any astronomical number, perform the AutoBurn with the AB button. After this MFDs should look like this:
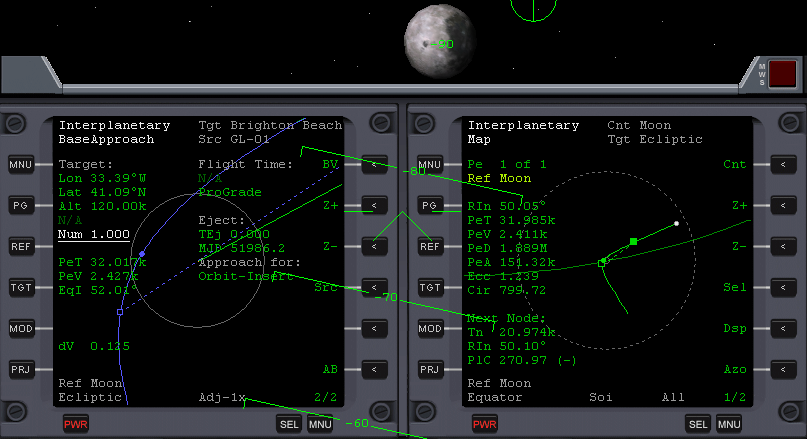
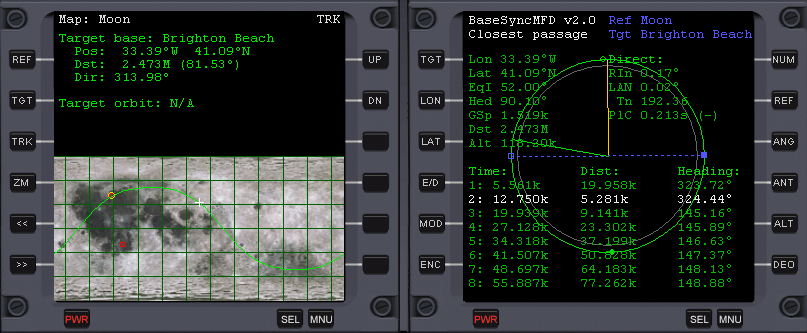
Notice how the prograde marker moved from the Moon, and how does our trajectory looks on Map program. Also notice the value of PeA on the Map. Because it's different from the planned one, we conclude that we'll be needing another course correction as we get closer. It's important to know that the closer you are to the body, the more fuel such a manoeuvre will cost, but for now we've done what we could.
As you can see on the left display, our current orbit (green) doesn't exactly match the planned one, what was predicted by the Map program. After a little course correction (AB) the MFDs will look like this:

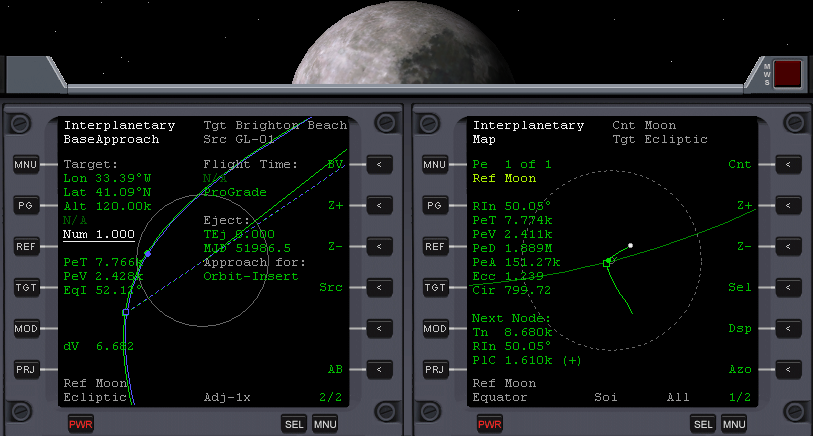
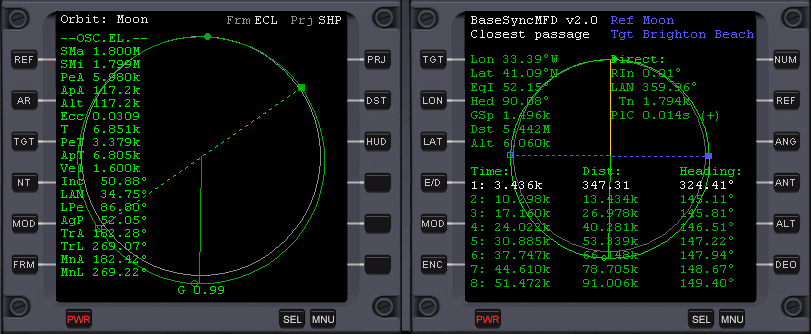
Notice that the Map shows only a little deviation from the planned orbit, so no correction will be necessary anymore. In the right display press MNU and select Course - Orbit insert, as below:
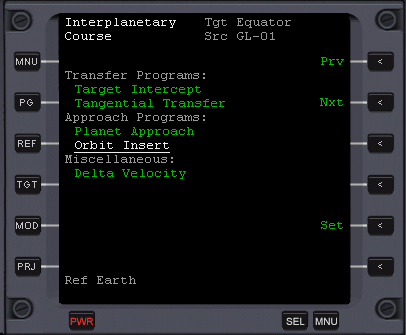
From our point of view it's a very simple program. Just press AB and wait.
The program will automatically orient us in the retrograde direction and perform a Lunar orbit insertion.
In the left display enable the standard Map MFD (and choose the reference body - Moon, if that's necessary). Target the base that you chose in IMFD-BaseApproach. In the right display enable BaseSynchMFD and also target the same base (ie. Brighton Beach). If the BaseSynchMFD shows a white text saying "DeOrbit Program" then we have to change it to a synchronisation program with the DEO button., as shown below:
Also change the Equator mode to Direct (E/D), which is better for bodies rotating as slow as the Moon. BaseSynchMFD shows your current and future orbits, and most importantly lowest distances from the targeted base and highlights in white the orbit which passes closest to the base. As we wanted in BaseApproach, the orbit is the first after the current one (Num 1). As we can also see in the Map MFD, our current orbit doesn't pass exactly over the base. Despite a distance of 5 km is not much, I'll show you how to use this MFD. When you are close to a node, projected as a blue line, orient your ship in the direction showed by PlC (-) that is Orbit Anti-normal (+ would be Orbit normal), and when you're at the node, perform a short 0.2 second burn, to minimise the distance from the base on the next orbit (ie. on the one highlighted in white). After the burn, enable Orbit MFD in the left display and wait one orbit so that the highlighted orbit is the current one, wait until you are on the other side of the globe with respect to the base (yellow radius) and make a short burn in the retrograde direction, so that PeA in Orbit MFD is 5 km. If you see PeR and ApR in Orbit MFD instead of PeA and ApA, then click the DST button (DiSTance mode).
It's time to tune our radio to base's transmitters. Switch on COM/NAV MFD in the left display and press Ctrl I.
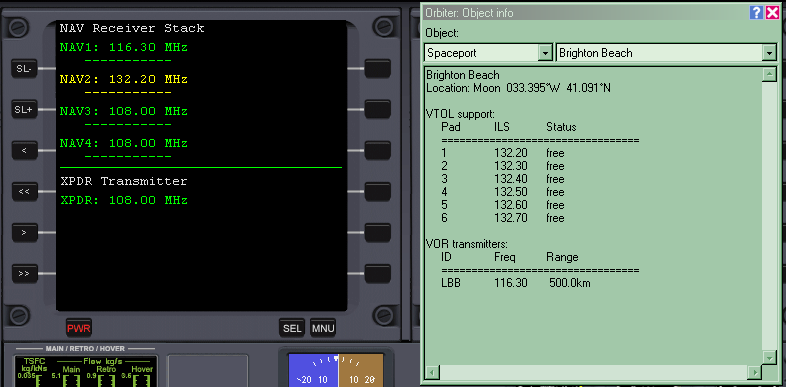
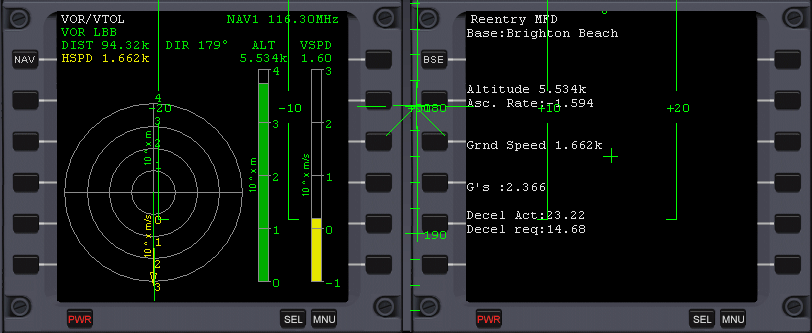
From the first pull down menu choose Spaceport and then from the second - Brighton Beach. Pass the VOR frequency to first NAV in the MFD, and then by using SL+ button select the 2nd NAV and enter the first landing pad VTOL frequency. In the left display enable VOR/VTOL MFD and in the right one - Reentry MFD and press BSE there to choose the proper base.
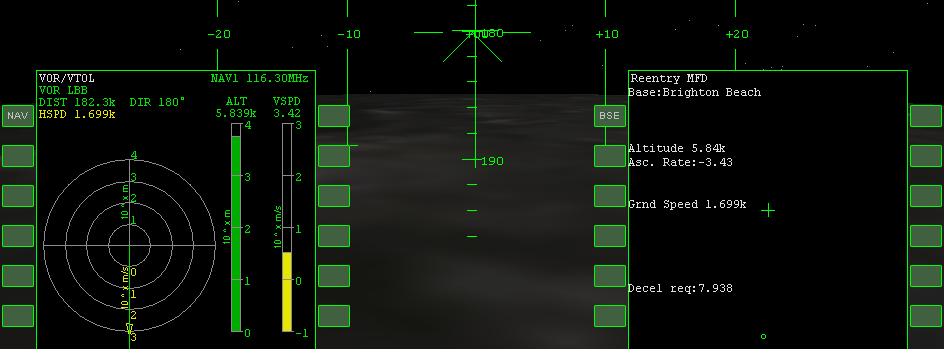
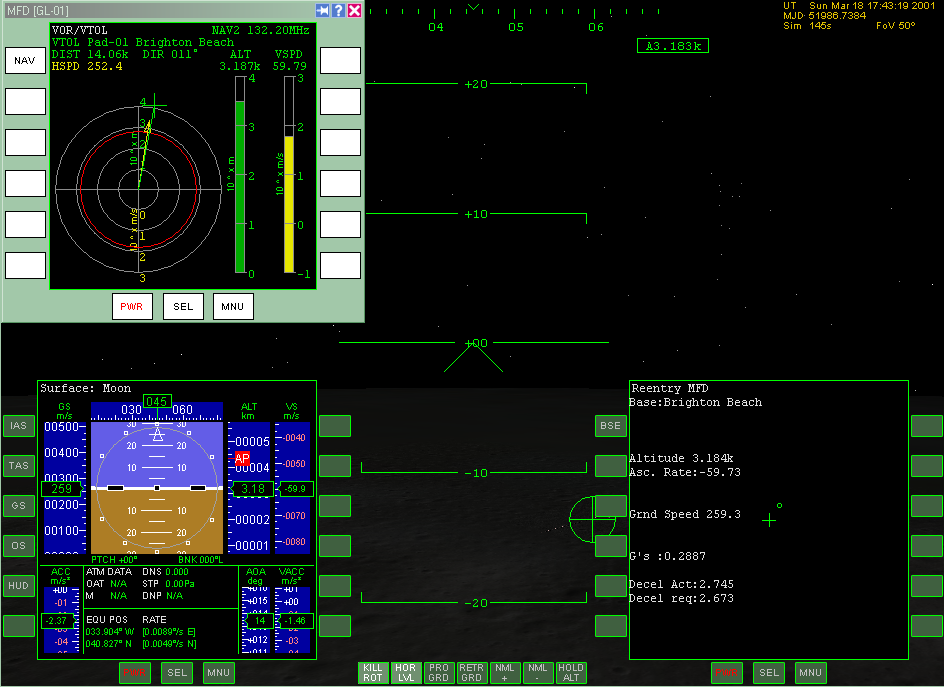
Once you're below 500 km from the base, we'll catch the VOR transmitter's signal. Switch HUD to Orbit mode and piont your craft in the retrograde direction. After setting the orientationm you must enable the Hold-Level autopilot (L) and keep your direction marker in the retrograde marker (the cross), as in the pictire above. Killrot will be of use (Num 5). Pause the sim while reading next portions of information (Ctrl P).
Notice that our trajectory (yellow vector) is a bit shifted w.r.t the target (green marker). We'd have to turn our velocity vector a bit to the left. Knowing that the maximal acceleration of your engines is in this moment about 20 m/s^2, wait until the required deceleration to arrive at the base with a zero velocity is 15 m/s^s (Decel Req.) and then, while holding down Control, press Num + and keep it pressed until your current deceleration is the same (Decel Act).
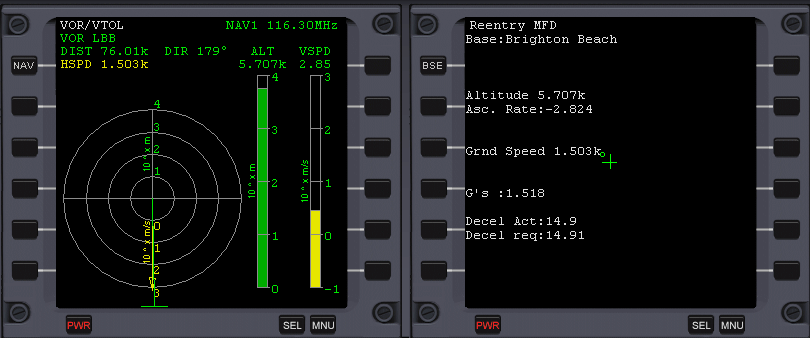
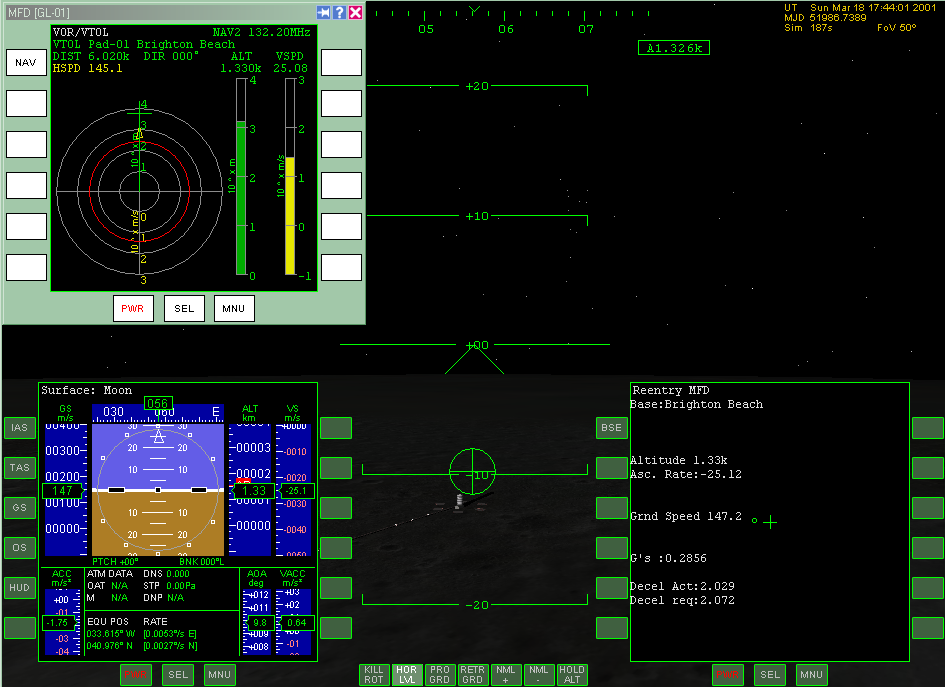
Having the green ball in Reentry MFD (that is base position) on the same height as the center cross, we can easily turn the ship with Num 1 and Num 3 so that the ball is on the cross. In this case, because I wanted to turn the vector to the left, I had to turn the ship a bit to the right - check the difference between the direction and retrograde markers, and also on the graphical representation in VOR/VTOL MFD. When the ball is exactly on the cross, immidiately turn the ship to face the retrograde marker and set engines to full power.
Now, by setting the current deceleration to a value bigger than the required one, we want to decrease the required decel. so that we may use the retro engines that have much smaller power, but using them will allow as to perform a more precise approach. Press [Ctrl Space] and in the top-right corner switch Retro doors from Closed to Open.
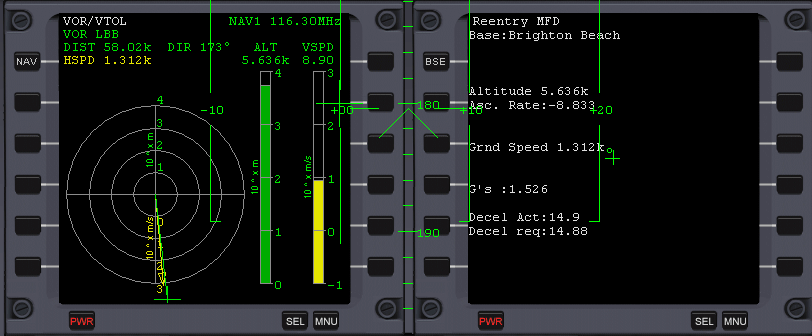
Enable Surface MFD in the left or external display, as in the picture above. It's important to know that since we've cancelled most of our orbital velocity, we're starting to fall down quicker every second, so we must counter the Moon's gravity with hover engines. Set their power to keep a constant descend, by zeroing out VACC (Vertical ACCeleration). VACC will be decreasing below zero so be ready to control it constantly. When the Decel Req. in Reentry MFD falls below 3.5 m/s^2, cut main engines' power with Num *, rotate the ship in the prograde direction (using Num 1 and Num 3, not the autopilot), turn on the retro engines and set their power to such that will be equal to Decel Req. Use Ctrl - and Ctrl + to adjust the decel. exactly. Switch the NAV reciever in VOR/VTOL MFD to number 2 with the NAV button, what will set the landing pad 1 as our target, as it has been defined in COM/NAV MFD. From now on forget about the ball in Reentry MFD (but not the Decel Act/req) and focus on VOR/VTOL MFD.
As you can see, the yellow vector in VOR/VTOL MFD is too much to left w.r.t. the pad, so since my deceleration vector is directed backwards, I've rotated the ship left w.r.t. the velocity vector (thus also to the prograde marker), so that adding these two vectors could result in rotating the vector right. When the velocity vector and base location indicator coincide, face the prograde marker. If you too can see the base already, then by adjusting the hover engines' power, set the prograde marker a bit above the base, to make it look like this:
From now on you can switch the engines into translation mode (Num /) and adjust the prograde marker, so that it's on the pad 1, or if you don't see it yet, just try to make the velocity vector and base location indicator coincide with Num 1 and Num 3. Lower your gear (G).
From some moment you can stop watching Reentry MFD and switch its display to VOR/VTOL MFD. When you are close to the pad, enable Hold Alt autopilot (A) and try to decrease the horizontal velocity with the translational thrusters, by shortening the velocity vector and directing it on the green base location indicator. When the indicator is in the middle, calcel out your horizontal velocity. In this time we allowed the HoldAlt autopilot to set a zero VACC (ie. counter Moon's gravity) and a zero vertical speed (VS):
Now you can disable the HoldAlt autopilot and by using the translational Num 8 and Num 2, set the vertical speed to -0.5 m/s:
Control position of the location indicator and keep it inside the green VTOL cone. After landing, disable all the autopilots and cut hover engines as well, after which your craft will be refueled.
Since you already know the Off-Plane transfer, it's worth knowing the remaining types of transfers (very similar to each other BTW.). You can read their description on the 5th page of IMFD's 4.6 manual, and see their graphical representation on the 10th.
I will demonstrate the Two-plane transfer in short. Check the Off-Plane item and change it to Two-plane with + or -.
After choosing the Moon as our target, a certain rotation and zooming in, we can clearly see how our trajectory will be tilted in a node (our and Moon's planes intersection) by a 79 m/s burn in the Orbit Anti-normal direction. After reaching orbit, best with azumith of 90°,(but not necessarily 90° and this is a particular feature of these types of transfers), don't forget to switch the Reatime mode to Prograde, and perform the AutoBurn. There's no EIn now since we'll perform the plane change anyway.
After departing from the Earth, on the above picture we can see, that we are Tn = 19 thousands of seconds to the node (notice how our and node radii are close to each other). It's time to give IMFD the plane change command.
Highlight the Prep. PlC item (Prepare Plane Change), next click + or -, what will pass the time to node to the TEj item (ie. time to engines ignition), press AB, accelerate time and wait for the AutoBurn.
That was the only difference. All the remaining part of transfer is performed in the same way.
To choose the most efficient type of one of the plane-changing manoeuvres, switch them as you did with Off-Plane to Two-Plane and watch the Tot dV. The smaller it is, the more efficient the selected manoeuvre will be in your situation.
IMFD's Map program has a few nice features. For example you may target the Moon and center on a hypotetical perilunium, using THT and Cnt (Center) buttons, where we enter r-moon. Entering x will switch the centering back to our ship. You can enter many different strings in the Cnt. Examples are shown after pressing this button. The Map program has also a nice feature of showing flight plans from other programs. After making any changes in your flight plan, press Plan in Map and check if the plan suits you.