Rocket Science for Dummies is series of tutorials that cover:
-
getting to low Lunar orbit with Shuttle-A
-
aligning, synchronizing and docking to on-orbit another Shuttle-A (SH-03)
-
landing in Moon's base - Brighton Beach
-
getting from Earth to Moon and back with a Delta Glider
Tutorials originaly written by Windlepoons and posted on Game Planet forums
Additions, modifications, corrections and adaption to Orbiter playback by Enjo (Simon Ender), under Windlepoons' permission.
You will need This playback scenario for live instructions and Reentry MFD if you want to land on Moon and Earth
After you have seen the whole tutorial using an instructor Shuttle-A/DG I recommend playing it again, pressing F3 and selecting another Shuttle-A/DG which are controllable and always close to the instructor ships. They're called SH-2 and DG-2. This will allow you to actually do the tutorial yourself while still seeing the playback notes. Be sure to untick 'Play at recording speed' under Flight recorder/player control panel (Ctrl+F5) what will allow You to control the time compression instead of letting the simulator control it. Anytime if something goes too fast for you, press [Ctrl P] to pause the sim and return here to reread instructions
Lesson 1 : Into orbit.
The first lessons will take place on (and hopefully around) the Moon - with no atmosphere to deal with and a fairly low mass, we'll be up and running in no time.
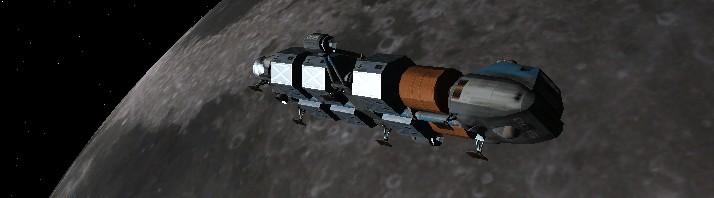
Start the tutorial scenario you should be greeted with an instructor ship, GPF-01 - a Shuttle Type A. Not a very sleek beast, is she?
If you want to control a shuttle yourself after you saw instructions for the first time, you can press F3 and select SH-2
Use the use the [arrow keys] in combination with the [control key] to slew your viewpoint around. Hold [PageUp] / [PageDown] to unzoom/zoom.
Once you've had a good look around jump into the cockpit [F1].
Press [Left Shift ESC] to power up left and [Right Shift ESC] to power up right display (or use PWR buttons under displays).
[L/R Shift F1] (or SEL button) opens a menu for L/R MFD mode selection, another presses cycle selection pages (if available). [L/R Shift ,] or [.] cycles MFDs on one page and [L/R Shift + Enter] selects highlighted MFD on L/R display
Press [LShift F1] and select Surface MFD on left display by pressing [LShift .] once and [LShift Enter].
Orbit MFD on right display is already on by default. Change its projection to Ship ([R Shift P] or PRJ button)
Turn on HUD and switch it to "Surface" mode - press [H] until it reads "Surface" in the top left corner. This HUD mode will be familiar to anyone who had flown a modern jet sim.
OK - time for take off. Slowly increase the throttle for the hover thrusters to about 90kN (~ 0.5 m/s^2 Vetrical Acceleration on Surface MFD under VACC) - [NumPad 0] or use the levers on the panel. The shuttle should begin to lift off the ground.
Engage "Horizon Level" autopilot [L] - this autopilot mode will keep the shuttle level.
Yaw the nose around to a heading of 090 - use [Numpad 1] and [NumPad 3]
Heading 90 is preferred because if you launch with 90 deg you add to your orbital speed the speed of your launch site, resulting from body's rotation. Not too much on Moon actually (you may check this speed on Surface MFD after switching it to OS mode (Orbital Speed) while still on ground)
Once the shuttle has climbed up to an altitude of 200m (listed both on SurfaceMFD and in the top right corner of the HUD) give the hover thrusters full power - hold down [NumPad 0]. Now the shuttle should leap skywards - things are starting to happen quite fast now.
Build your vertical speed up to 100 m/s - visible on Surface MFD under "VS". When reached immediately cut your hover engines by holding [NumPad .].
We will still be going up but slower and slower because the gravitational field applies a negative acceleration to our ship, contrary our velocity vector which is still straight up and decaying.
Now we need to wait to reach about the highest point of our trajectory called apoapsis.
When you see a red AP marker starting to appear under ALT on Surface MFD it's time to give the main thrusters full power - Hold down [NumPad +], tap [Control] and then release [NumPad +] - this should lock the throttle at full power. What we need is a lot of horizontal speed to build our orbit, and that is what the main thrusters are doing right now.
My attempt to explain why we need to gain the horizontal (tangential) velocity is the following:
(If you're not interested, you may skip this part and move on to the next point)
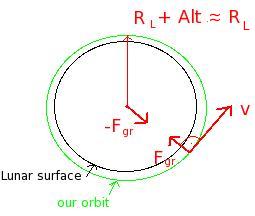
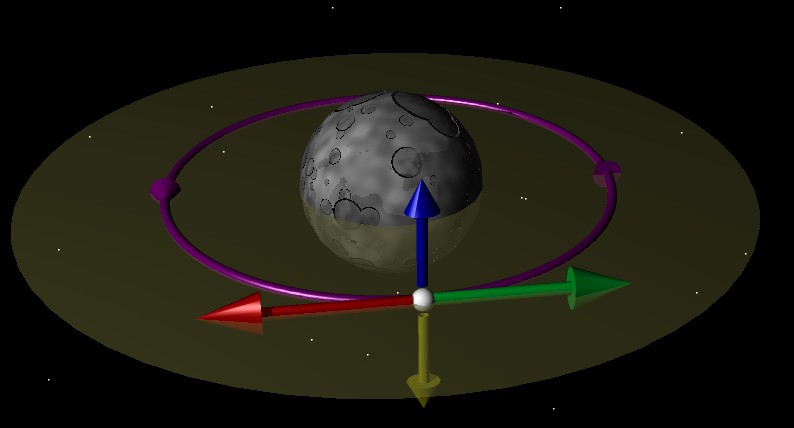
take a look at this picture:
When we are in orbit we want to move forward thanks to the tangential velocity but our trajectory is curved because a gravitation force is influencing our ship
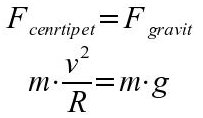
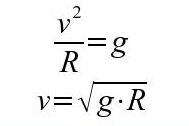
As you may know if you want an object to be in an circular motion, it needs to have a centripetal force, constantly curving the trajectory. Its definition is following:
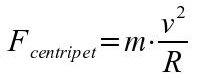 m - object's mass; v - object's velocity; R - circle radius
In orbit the only force which acts directly on us is the gravitation force defined as:
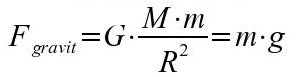 G - constant of gravitation; M - major body's mass; m - minor body's mass
R - radius between bodies; g - major body's characteristic acceleration
G - constant of gravitation; M - major body's mass; m - minor body's mass
R - radius between bodies; g - major body's characteristic acceleration
To be able to call our movement a circular one, we must generate and adjust such a centripetal force which will be equal to the only force influencing us, constant on a given altitude - the gravitation force. In other words the centripetal force needed to curve our motion becomes the gravitation force. If you create such conditions you'll be in a circular orbit. Of cource to be in a motion and to generate the centripetal force we need to have some amount of tangential (horizontal) velocity (as in the first equation) which we are building now.
To finish the topic and give an important conclusion let's continue with the math:
As you can see the velovity needed to equalize the two forces is a major body's characteristic constant and independant of our ship's mass. In other words you need to have the same velocity to reach a low Lunar circular orbit with a Shuttle-A and a Star Destroyer :) The only problem is that it's harder to accelerate the Destroyer to such speed using the same engine...
The reason why we start to accelerate horizontaly at apoapsis is because it's most eficient this way and otherwise you'd surely go on a balistic trajectory (hitting the surface) instead of getting on a circular orbit. We'll get to it later. We don't wait until we are exactly at apoapsis because building orbit takes some time. If I started accelerating too late we'd start falling down.
If your velocity marker (cross in circle) starts dropping below +00 pitch (ie. you start falling down) activate hover thrusters with low power to counter Moon's gravitation force (VACC and VS should be 0). Reason - this is a necessary condition for our orbit to be circular. Notice that if you don't activate hover engines, vertical acceleration (VACC on Surface MFD) rises from negative values to 0 anyway. This means that we are getting into orbit.
Watch OrbitMFD closely. You should see the green curve representing your orbit slowly fatten and extend. Keep an eye on the number labled "Ecc" - this should be dropping towards zero. As soon as it starts to increase again, kill the main thrusters immediately [NumPad *]. Notice that orbit extending appears non-linearly i.e. faster and faster. This is because in the equation for centripetal force the velocity is squared
Double check that all the thrusters are at zero power. Switch Orbit MFD to Altitude Distance mode ([RShift D] or DST button). If both PeA and ApA (Periapsis and Apoapsis Altitude) are bigger than 0 km then you're in a very low Lunar orbit - well done!
Disable Horozon level autopilot by pressing [L] again. Use [NumPad 2, 4, 6, 8] to roll, pitch and yaw the shuttle around - don't worry about which way you're facing or if you're in a wild tumble...your orbit is stable as long as none of the thrusters (main/hover) are active.
The easiest way to stop any rotational motion is to use the "KillRot" autopilot - tap [NumPad 5], and the autopilot will fire the various attitude thrusters so that the shuttle stops rotating.
Switch the HUD to "Orbit" mode ([H] to cycle modes).OK - time for a little bit of theory.
There are four primary directions used to describe your craft's attitude while in orbit.
Prograde - In the direction of travel
Retrograde - Opposite to the direction of travel
Orbit Normal - perpendicular to the orbital plane
Anti-Normal - the mirror of orbit normal.
Almost all orbital manouvers use one or more of these vectors, and Orbiter provides an autopilot mode for each of them. Tap [ to engage "Prograde mode" - the caft will begin to rotate. Notice that the prograde vector is represented by a cross in a circle on the HUD. Tap ] to engage "Retrograde mode" - the retrograde vector is represented by a cross. These two directions are fairly intuitive.
Now engage "Orbit Normal mode" - tap the ; key. The shuttle will rotate to 90 degrees away from it's direction of travel. The ' key will engage "Anti-Normal mode" and point you the other way. It can be very hard to figure out which is normal and which is anti-normal - one way to remember is to use your right hand. The curl of the fingers represents the prograde direction, and the thumb extends to the orbit normal.
And that's the end of the lesson - next time we'll change the shape of our orbit to suit our needs, and learn what some of those scary numbers mean on OrbitMFD.