In this part we'll learn how to align orbital planes with an object in Moon's orbit, what is the first step towards the object's interception.
Scenario files available in Zip format or 7zip self extracting archive. Playbacks are redone and fit to this re-edited version
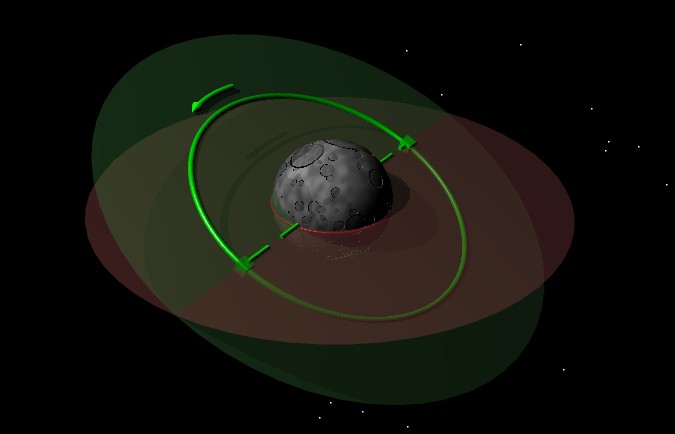
Notice how our orbit carries us north and south of the equator - the orbital plane is inclined with the equatorial plane at about 41 degrees.
By default Orbiter uses ecliptical frame of reference for OrbitMFD as well as for Scenario Editor. Please switch OrbitMFD to equatorial frame by using either [RShift F] or FRM button which is better for low-orbit operations. Refer to manual for more info.
The two points on our orbit where the two planes intersect are referred to as nodes. The ascending node (where our path goes from south of the equator to north) is marked in OrbitMFD with a filled box, and the descending node is marked with an empty box. The two nodes are connected with a dotted line.
Close Ext Orbit MFD. Note that your eccentricity did not change much , while the path you describe through the sky has changed dramatically. This manouver is referred to as an orbital plane change and it is used to align your orbital plane with other objects (be it a planet, a spacecraft or a surface base).
Just a side note:
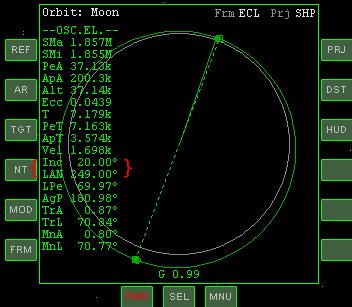
Your eccentricity changed because it's impossible to accelerate purely Orbit Normal/Anti Normal in this craft while thrusting with 100% of power. During the burn we had the orbit normal autopilot on but if we want to turn our path (thus change our orbital plane) the autopilot has to constantly keep us orbit normal and this direction changes as we burn and turn. Take a look at this picture, taken in the middle of the burn:
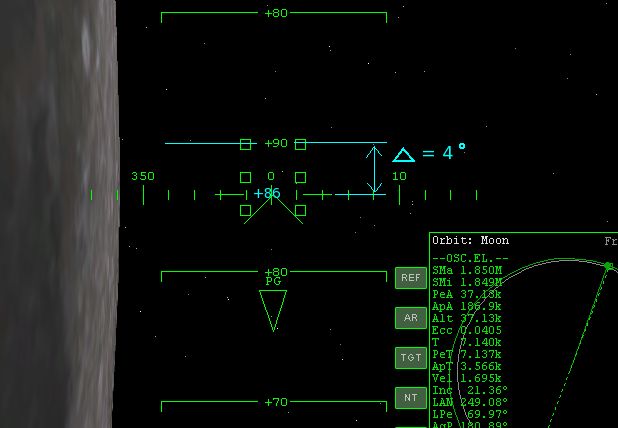
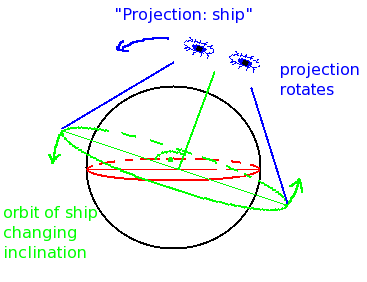
I was saying about Orbit MFD's projection. Projection:'target' means that we'll be watching perpendicularly to 'target's' plane all the time. By saying 'all the time', I mean that if target changes it's inclination, the projection would also change to be constantly perpendicular.
 |
 |
And just to be rigorous...
As for other scary numbers:
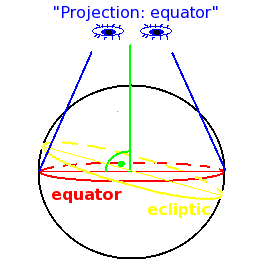
Here are the principles of above:
 |
 |
 |
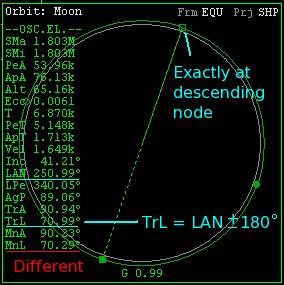 |
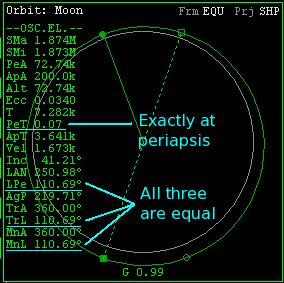
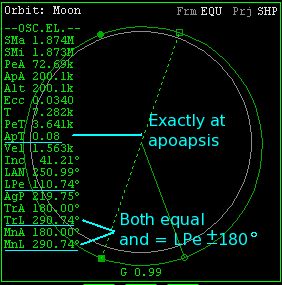
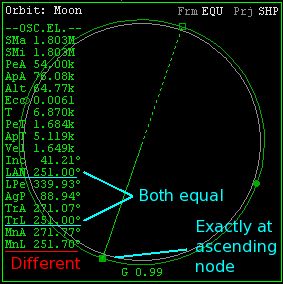
Notice that MnL equals TrL only at your peri/apoapsis so it will be of no use if you want to accelerate at eg. target's peri/apoapsis or even at your nodes. Another thing is that you'll have to add 180 deg to LPe/LAN if they're below 180 and substract 180 if they're above 180. The resulting TrL must be (0,360)
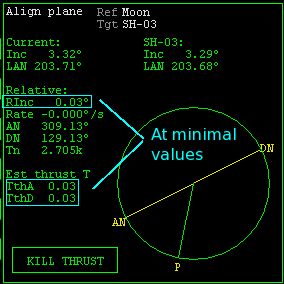
There is another Shuttle Type A in orbit around the Moon, and we are going to try to rendezvous with it. To do so it is essential that you align your orbital plane with it, and there is an MFD for just that purpose - AlignMFD.

This MFD lists both your and the target's inclination and LAN, and shows a stylised graphic of your orbit showing your postion (the green radial line) and the postion of two nodes where your orbital plane intercects with the target's orbital plane. It is at these nodes where we'll do the plane change. Note that these nodes aren't the same as those in OrbitMFD.
Further down it lists the relative inclination between the two orbits (Rinc), and the rate of change of Rinc - it should be zero because you are not firing any thrusters.
The next two lines show the relative angles to the ascending and descending nodes.
Tn is the time in seconds until you reach the next node - in this case the ascending node.
An important extract from Orbiter manual:
Note that the required velocity change (Delta-V), and thus the burn time, depends on the orbital velocity, and may therefore be different at the ascending and descending nodes, if the
orbit is not circular. The MFD shows the burn times both for the ascending (TthA) and descending nodes (TthD).
Burn time will be bigger for a lower node (which you pass with higher velocity) so chose higher nodes (lower velocity).
Tip: It is often more fuel-efficient to make the orbit more eccentric before applying the plane
change, so that the radius distance of one of the nodes is increased and the corresponding
Delta-V decreased. In particular if the plane change is to be combined with other changes to
the orbit, a careful planning of the sequence of burns can help to minimise the fuel expenditure.
For atmospheric bodies, after making the orbit more eccentric and applying the plane change you can lower the periapsis, placing it in the atmosphere and use aerobraking as a substitute for retrograde burn to lower the apoapsis to the previous height what will save fuel again. Remember to raise the periapsis above the ATM at next apoapsis crossing.
If all has gone well, Rinc should now be near zero - certainly less than 1.0. If it is not, you may wish to perform another burn at the next node. Don't worry when the nodes suddenly shift 90° from your radius. This is normal and indicates that your planes have nearly the same inclination.
Now you know how to change your orbit's inclination, and how to align it with any other orbit. In summary, plane changes are performed at nodes - when passing an ascending node you burn down (anti-normal) and when you pass a descending node you burn up (normal). An easy way to remember it is: Ascending Node = Anti Normal.
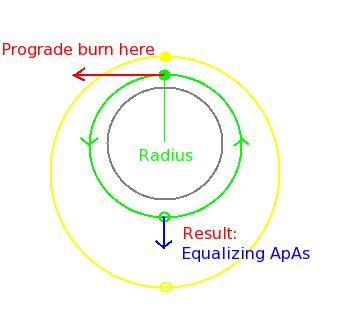
In the next tutorial we'll try to rendezvous with SH-03. Meanwhile we have to be on an orbit of the same shape as SH-03. We must adjust your orbit using prograde and retrograde burns so that your orbital radius matchs SH-03's. OrbitMFD displays Sh-03's orbit in yellow as well as your own in green.
In general if you want to make your orbit the same shape as another one (not necessarily a circular one) first you have to make your orbit circular to allow you to define longitudes of your new periapsis and apoapsis by accelerating pro/retrograde in a point of our choice. If you start accelerating exactly at longitudes of target's apo/periapsis then your peri/apoapsis will be in at the same longitudes as target's. Another thing to do is making their heights the same. Start equalizing one point (apo/peri) at target's apo/peri longitude and once it's done coast to the newly created point and equalize height of the other one
|
A conceptual picture of our situation:
|
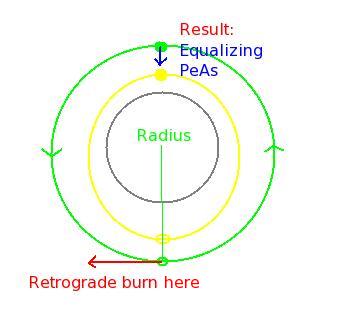
and of a reverse one:
|
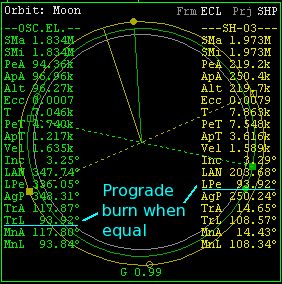
Also consider as an option accelerating prograde at target's apoapsis longitude (as in our situation) to make our new apoapsis, on the other side, the same longitude and height as target's periapsis (left picture above). As for the reverse situation - you may accelerate retrograde at target's periapsis longitude to make your periapsis the same longitude and height as target's apoapsis. Once you master synchronization in next tutorial, you'll find this method more efficient I guess.
Please circularize your orbit before doing anything else. RCSes in linear mode have to be involved
Now, you'll have to use the knowledge gained before, concerning TrL and LPe
Our situation:
 |
and a reverse one:
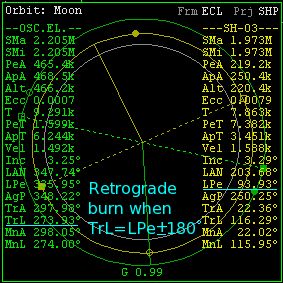 |