Lesson 4 - Ships that pass in the Night
Hopefully you have managed to shape your orbit to match that of SH-03 - Our next task is to syncronise our orbit with SH-03, and dock with it. In this part I'll give you some general synchronisation techniques at the end of the document. Reading them is not neccessary to accomplish this part but I it's always good to know how to synchronise in general situation, not just this particular one. Addon used for the optional tips is Arrive MFD.
You must download This save state or its EXE alternative. It had to be a only bit modified. Particularly I had to add a radio trasmitter to SH-03 which will help us during docking.
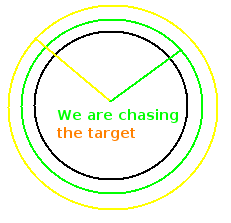
We are now orbting around the Moon, chasing SH-03 almost exactly - but how do we catch up? The first intuitve impulse is to do a prograde burn - after all, we want to go faster so we catch up, right? But let's examine what happens if you do this. Recall from your flight so far that a prograde burn raises your orbit - giving you a longer path to fly, and slowing you down. If we do a prograde burn we'll actually fall further behind!
What we need to do is take a short cut around the Moon - we need to fly a shorter path, and fly it quicker...
...a retrograde burn.
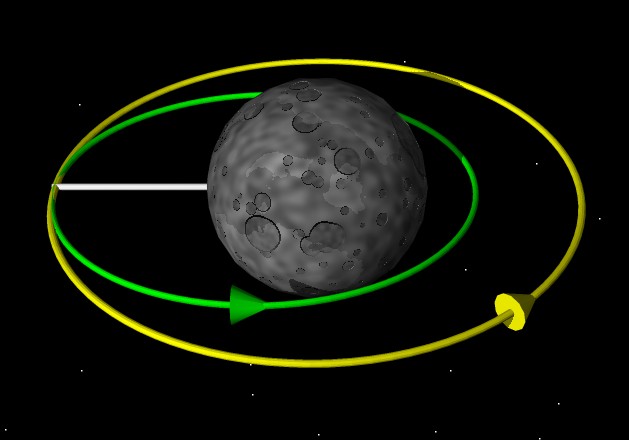
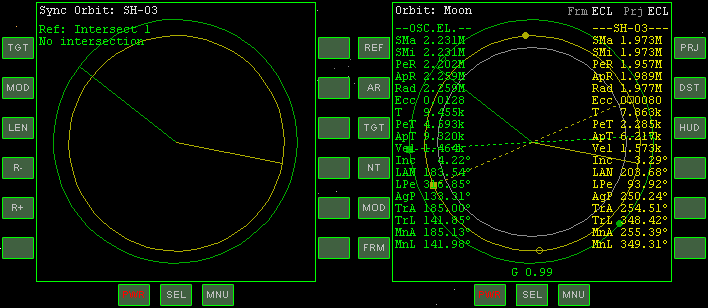
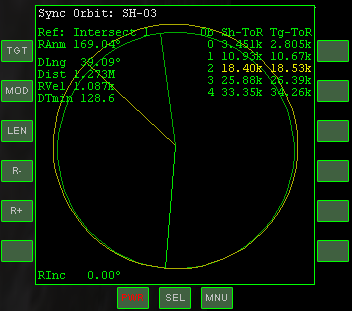
SyncMFD shows our orbit and that of SH-03, the current postions of both craft (our position as a dull green radius, and SH-03's as a yellow radius). The bright green radius is the reference line. The reference line is the best place to change our arrive times by doing pro- retro- grade burns, because only burning there won't change the reference line's position. All the calculations made by the MFD refer to this line and it can be switched between several locations.
While it's possible to synchronise with a target using all options from above, "Intersection 1 and 2" is generally preferred because only meeting with target (ie. having the same longitudes) at orbits' intersection guarantees that you will also be at the same altitudes at the moment of interception. That said, our situation is specific in this way because we have already equalised PeA and ApA with the our target so we are roughly at the same altitudes on whole current orbit
The pro of 2nd set of options (Sh ap and Sh pe) is that, as you may remember, the points in orbit at which it's most efficiently to change altitude of the oposite one (thus trying to synchronize) are our Peri- and Apo- apsis. These modes require some thought, ie. if we want to do a retrograde burn to catch up with the target then the point closest to target's orbit will be Sh apoapsis so we'll choose this one now. On the other hand if you will be doing a prograde burn to let the target catch you, you'll have to choose Sh periapsis.
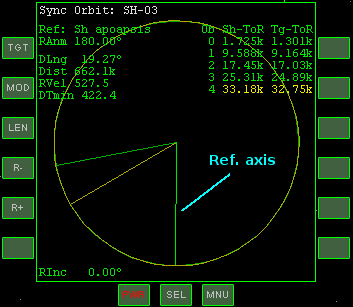
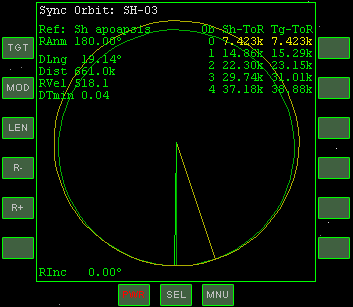
On the right of the MFD are two lists of numbers - Sh ToR and Tg ToR (ToR stands for "Time on Reference"). These numbers show the time in seconds until each craft crosses the refernce line, for the current (0) and next four (1-4) orbits. To catch up with SH-03, we need to adjust our orbit so that we cross the reference line at (almost) exactly the same time. The two crossings which are currently the closest are highlighted in yellow. The DTmin is a difference in arrival times to the reference line for the highlighted pair. Use this parameter for precise burning.
 |  |
Now, if you were precise enough with DTmin and Rinc, you should be within 5km of SH-03. at this distance, if we are careful and patient, just burning straigt at SH-03 will get us closer - for the most part, common sense reigns again. IF you happen to be much further like 40 - 200 km, you can't just burn towards SH-03 because at such distances the change of your orbital parameters will influence your relative motion non-linearly and you'd eventually start receding instead of closing. You can try Rendezvous MFD which will get you to the target but I won't describe it here. You can also try to resynchronise... and be more precise :)
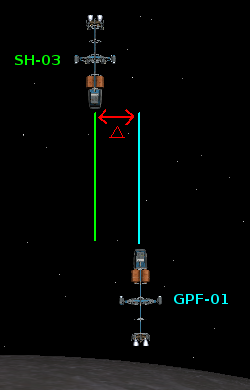
Approach path misalignment
 |
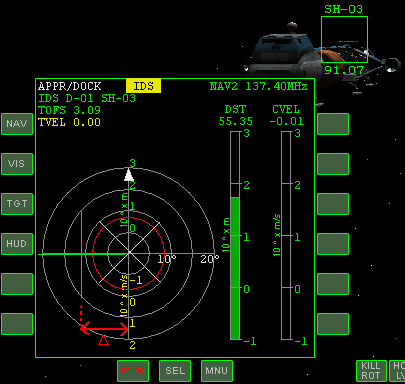 |
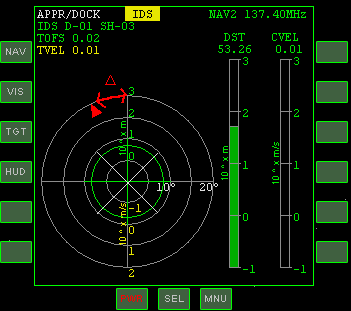
In this case the ship is not on the approach path - the green line extending from SH-03. To correct, accelerate ship left, using [Num 1] in translation mode and cancel out relative velocity once there. On the right we can see that the magnitude of approach path misalignment is measured by a green cross (approach path indicator) and TOFS - tangential offset. Once you start getting on the approach path, the cross will gradually center and TOFS will decrease. You are relatively aligned if you keep the cross inside the aproach cone, which will then turn green instead of being red.
Longitudinal misalignment
 |
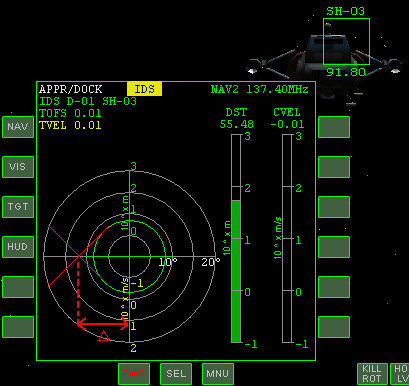 |
The planes of both docking ports aren't parallel. The ship is simply pointing in the wrong direction. Rotate left and kill the rotation once roughly aligned. In the Docking MFD we can see that the magnitude of longutidinal misalignment is measured by a red/white dashed cross (longitudinal rotation indicator). Once you are aligned it will turn white. Now look at the left picture. A very important thing to note here is that the approach path indicator (green cross) shows that we are properly aligned on the approach path. This is because Docking MFD measures the alignment from the doking port, not the center of the ship. If we rotated left to align longitudinally we would suddenly loose the approach path alignment because the front of our ship (thus the docking port from which the approach path alignment is measured) would move left, away from the path, misaligning you again. This is why you should rather align longitudinally first, and then get yourself on the app. path. Another reason is that it will be easier for you to operate the engines in translation mode when longitudinally aligned. Acceleration vectors will then be purely perpendicular or parallel to the approach path what simplifies the matter.
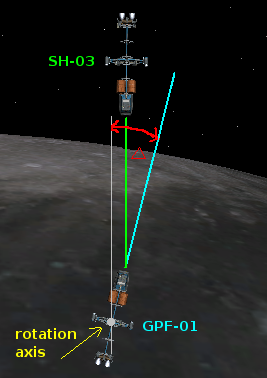
Rotational misalignment
 |
 |
Our ship doesn't have the correct orientation. Here you must just rotate the ship left using thrusters in rotation mode and by pressing [Num 4] and killing rotation once the top red triangle in Docking MFD (longitudal rotation indicator) is placed on a vertical circle connector (just exactly on top). Once you are aligned, the triangle will turn white.
Two important values in Docking MFD are:
TVEL - Tangential velocity - any velocity perpendicular to the approach path. TVEL of 0.00 guarantees that you won't change distance from the approach path so if you're aligned and on the app. path keep the TVEL at 0 m/s.
CVEL - Closing velocity. Can be positive (closing) or negative (receding).
The DST value is the distance to target.
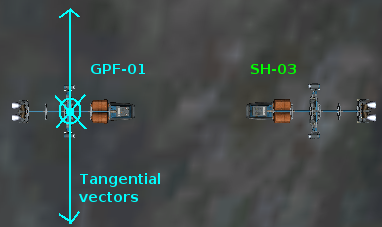
Once you start moving your ship you'll see a yellow arrow appear in Docking MFD (tangential velocity indicator). This neat indicator shows us in which direction w.r.t target we are rotating / moving using translation mode.
To align longitudinally I had to rotate left thus making the arrow point in the direction of longitudal rotation indicator (red cross). You will usually have to combine 2 axis rotational/translational manoeuvres to set the proper arrow direction. Remember that the arrow shows movement w.r.t. target and that translational [Num 1] = left, [Num 3] = right, rotational [Num 4] = left, [Num 6] = right BUT despite their location in NumPad - translational and rotational [Num 8] = down not up, so it can be a bit confusing to move the arrow in the direction you want. It will point left if you press left but will point down if you press [Num 8] (intuitive up) and up when you press [Num 2] - just in the direction you'll move.
It's not necessary to increase the magnitude of the arrow to make it reach the crosses. Only direction matters and besides, it would be a waste of fuel and could lead to further inverse misalignment, saving only a little time if it succeded.
After you have aligned longitudinally, press [Num 5] to kill rotation. After aligning on approach path, you have to cancel out relative velocity manually. Here is where the arrow helps. Using translation mode, try to counter its direction so that it gets smaller and eventually dissapears and TVEL reduces to 0.
Remember that Docking MFD operates on logaritmic scales. It means that the smaller a value is the more sensitive the MFD becomes in displaying this particular value.
By moving towards last rectangle you already roughly aligned yourself on the approach path and by facing the target - longitudinally (still - roughly). The rotational alignment can be also roughly achieved thanks to the approach path rectangles.
Keep in mind that this type of synchronisation (a retrograde one) is sane only if the target is ¼ ahead of you max. In any other case there is a great danger that if you start a retrograde burn to try to synchronise, the PeA may fall below surface or at least into the atmosphere. For such cases use a prograde synchronisation.
Next time, we return to base.
In this subsection I'll try to teach you some general synchronisation methods to regularise your knowlegde. Download Arrive MFD, extract the archive to Orbiter main directory and activate in the Launchpad > plugins tab. Warning! It will crash your Orbiter if you try to move its window. The correct playback for this subsection is named: RSfD-4-ships-that-pass-in-the-night2-optional.scn
We'll start from much higher orbit than SH-03.
We are 160 degrees before SH-03. First thing to do would be orbital alignment and after that - circulisation. Notice that our orbital period, distance to travel are already greater, velocity is smaller and we can use it all as adventages. It means that we don't have to equalise our orbits from the start but we can simply ... wait for SH-03 to roughly catch up with us and actually it's the best thing we can do if it's about saving fuel and time, when our orbital radii are much different.
We'll wait for SH-03 to be about 45 degrees (1/8 of orbit) from our position and then start a retrograde burn to create an intersection of our orbits. Be aware that waiting for this particular angular distance is not a rule of thumb but a total guesstimation and depends strongly on orbital velocity difference. We won't know when we'll meet with our target until we create an intersection. An ideal situation would be if you could simultaneously apply the retrograde burn at one of target's apses. It will be where our velocity vectors directions are closest, thus relative velocities smallest. We'll use Intersect option for this case for better precision.
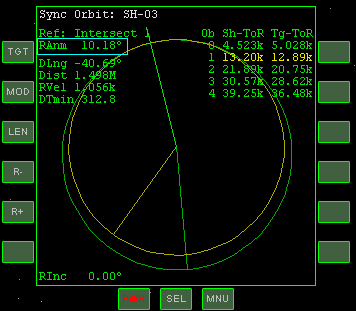
The most important parameter now is RAnm (top left) - true anomaly of reference axis - the direction of the reference axis w.r.t. the ship's periapsis direction. We will be modifying our orbit at the ref. axis because then the axis' position won't change so to make our synchronising burns optimal, it has to be placed as close to our (ie.) periapsis as possible. On the other hand due to non spherical gravity sources the RAnm can oscilate with an amplitude of about 0.4° for the Moon, plus because we'll do one precise burn before the periapsis (thus changing PeA and possibly reducing RAnm), it can get dangerously low and we can eventually loose the intersection if it goes below 0°. From these reasons you should set it a bit higher. IMHO RAnm of 10-12° is still optimal, safe and "enough for everyone" ;)
Accelerate time to reach the ref. axis. All the time keep aligning the orbits, should the RInc change.
As you approach the ref. axis prepare to minimise difference in our arrival times - DTmin (and you have to do it everytime you pass the ref. axis).
You can anticipate the proper attitude (pro/retro-grade) of burn by doing some logical thinking: If our highlghted Sh-ToR is bigger then the highlighted Tg-ToR then we'll arrive DTmin seconds later, so to arrive in the same time we have to decrease our orbital period and we can do it by accelerating ... retrograde. Initiate the burn when first value under Sh ToR is close to 0 s. After that help yourself with translation thrusters to get DTmin below 0.1 s.
If from some reason you happen to loose the intersection, accelerate with appropriate attitude 180° from the former point of intersection with low power to create it again (ie. retrograde at apoapsis). The difference in orbital periods can get unacceptable then but it's still cool if you are a few orbits away from the interception because you can adjust the period greatly at intersection. Too bad if you lost the intersection at 0 orbits to interception. This would mean you have to resynchronise or use Ref: Manual Axis which make the distance at interception bigger but possibly still acceptable.
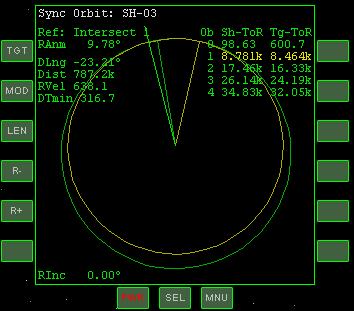
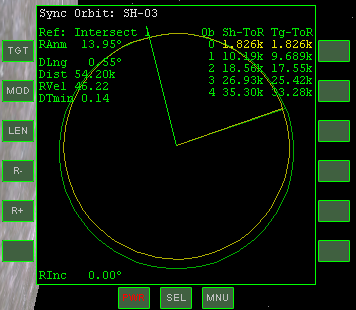
1 orbit further DTmin changed by itself and we have to resynchronise before reaching the ref. axis, using translation thrusters so when you are closer to ref. axis than 1/4 of orbit turn prograde and use the thrusters with 10% of their power to get DTmin to 0.00.
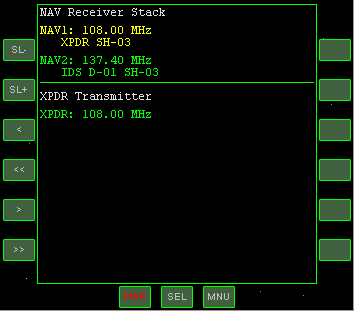
Now, if you were approaching a space station, it would be a good time to tune your NAV reciever to station's XPDR frequency in the same manner as you tuned to SH-03 IDS freq. You didn't have to do it before because all the sips use the default XPDR frequency, unless told otherwise in a scenario file, so it was already tuned.
It is time to learn how to finish the interception precisely. We want to arrive close to target with zero relative velocity. There are two ways of doing so. I'll teach you how to do it using Arrive MFD. The other way would be using Equation MFD (equation r=dV^2/(2*ap) ) but as long as Arrive MFD works we're fine with it (it didn't work with Orbiter 2005). Enable Arrive MFD in right display with [RShift F1] and [RShift V].
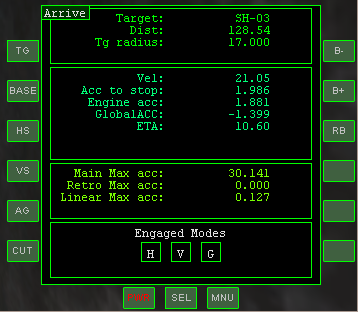
Press TG (target) button and type SH-03. The MFD will then display in the central frame the relative velocity (Vel), the acceleration which you'd need to apply now to stop at target with zero velocity (Acc to stop). As you get closer, the Acc to stop will increase. Engine acc is the current engine acceleration set by you. If you want to start matching the velocity, you have to set Engine acc equal or a bit greater then Acc to stop without hitting the target. The third frame is concerning engines accelerations. A parameter of our interest is Main Max acceleration. Never let Acc to stop go beyond this or you won't be able to make it and will hit the target even if you use engines with max power.
Arrive MFD calculates all values constantly so any errors resulting from making wrong assumptions (ie. linearising a curved trajectory) can be corrected by you on the fly by you by changing main thrust.
Switch on Docking HUD and face the relative velocity marker. Start decelerating when you are close to the Ref. line and see that Acc to stop starts to increase dramatically. Set engines power (or rather acceleration) to be equal or a bit more than Acc to stop and keep it this way. Cut their power when RVel = 0.
I know that using tools to cancel out 100 m/s RVel while having 30 m/s^2 of max engine acc. is like using a bazooka to kill a fly but you'll apprieciate this knowledge once you'll start using realistic craft with 60 times less engine power (the Space Shuttle) or will have much bigger orbital periods differences.
Proceed with docking as described before. The difference is that because we used "Intersection" option we'll be so close that we'll have to move away from the shuttle first ;)
As you may have already figured out there is also a possibility of an inverse situation, ie. when our radius is smaller than targer's. Then, we are the ones who chase the target, as it was in the very first case. As I have proven later you don't need to equalise orbital altitudes or even create the intersection from the start, but can wait until you are closer to the target and then create the intersection with a prograde burn.
Apart from the prograde instead of retrograde burn, the only notable difference is that the resulting RAnm will be (180 - X) where X is the usual value, because it always dsplays the distance to Periapsis and our intersection is at apoapsis - 180° 'round the clock ...
... so if you want the intersection to be 11° from your apoapsis, set RAnm to (180° - 11°) = 169°
Be aware that this method of synchronisation is widely used for eg. STS missions
The last thing I want to say is that it's possible to actually plan the synchronisation burn to know when you'll meet the target using TransX, before even igniting engines. Maybe I'll cover it in another tutorial in future.